
Introduction
This document provides detailed steps for setting up your merchant profile, creating a processing profile with access to the merchant wallet, and navigating through both testing (sandbox) and production (live) environments. Additionally, it walks you through the deposit process using a card, covering the flow, validation, callbacks, deposit transaction creation, approval webhook setup, status checking, transaction approval, cancellation, and testing procedures. Follow the sections below to manage your account and transactions efficiently.
1. Account Setup
Create 2 profiles where the first profile will be of the Merchant having a wallet to be able to receive funds and the other profile will be of Processing which will be used for creating the transactions on the merchant’s account wallet.
1.1 Create a merchant profile
Create an account by registering from the Login screen. Use the link to follow the steps of becoming a Merchant.
1.2 Create a processing profile with access to the merchant wallet
A processing profile is required to manage the transactions of the merchant. Use the link to follow the steps of creating a processing profile.
2. Environment & Authentication
Before starting the integration user needs to know about the available environment and authentication methods required for integration. Use the link to learn about these details.
3. Deposit Using Card
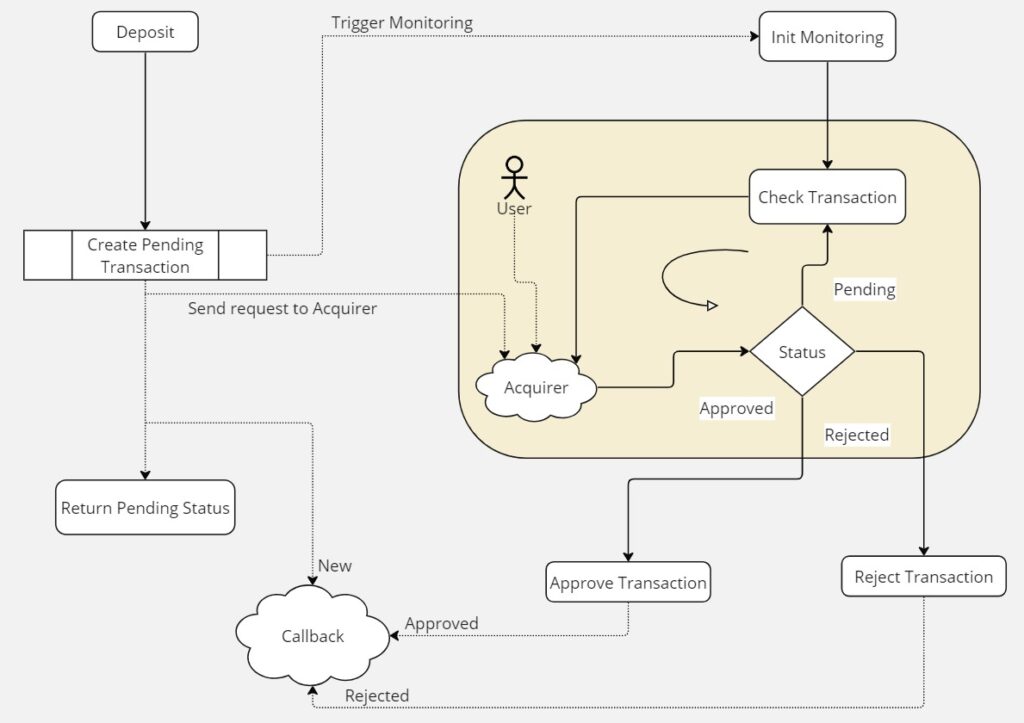
3.1 Flow
3.2 Steps
- Create Deposit Transaction Using Card
- Wait for a callback.
- Check status.
After you have called the Transaction/CardDeposit endpoint, a payment request is sent to the Acquirer network to process the card payment. A pending transaction is also created and Xprizo will continue monitoring the Acquirer network until an approval or rejection is received.
If the card is ‘Approved’ (2DS) then the transaction will be added to the merchant’s wallet and the API will return an ‘Active’ status. No further action is required.
If there is a problem creating the transaction then the API will return a status of ‘Rejected’.
It is possible that a card is not processed immediately such as some kind of delay or the user might need to approve the transaction using another device, then a ‘Pending’ status will be returned.
In the case of 3DS, there could be a redirect to an alternate URL. In this case, a ‘Redirect’ status and URL is returned.
The Merchant will get updates on the status of the transaction via callbacks. To receive a callback, you will need to request to set this up on your Merchant account (the profile that is used to create this transaction). This can be done by going to settings/preferences and setting the “Approval Webhook” to point to a URL of your choice. You can also set this using Preference/SetApprovalWebhook
A callback will be sent when
- The pending transaction is created.
- The pending transaction is approved
- The pending transaction is rejected
You can use this link to see the response coming on this Webhook.
**Note: You should, however, check the status, after you get a callback to confirm that the transaction was completed successfully. You can use Transaction/Status endpoint to check the status.
4. Deposit Using Xprizo Wallet
To make a deposit, funds are transferred from a user’s wallet to the merchant’s wallet. This process is done by requesting a payment from the user through the Transaction/RequestPayment endpoint.
4.1 Flow
This is an example of the flow that should be used when integrating with Xprizo to perform deposits.
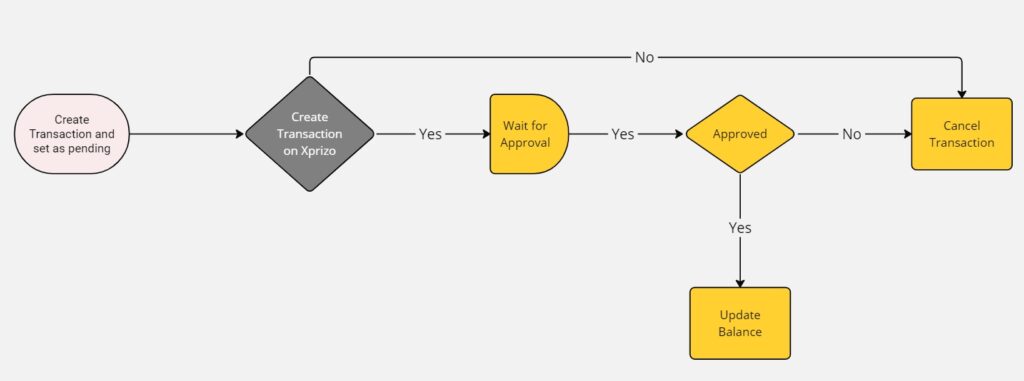
- (on merchant) Create a new transaction.
- Create a reference to be used for this transaction.
- Set the transaction as pending.
- (on Xprizo) Create the Xprizo transaction.
- Find the user’s wallet using their phone number or email or username, and the specified currency through the Wallet/Info endpoint.
- Find the merchant’s wallet with the same currency using the Wallet/Info endpoint.
- Create transaction using Transaction/RequestPayment
- Wait for the callback.
- Check the status of the transaction Transaction/Status endpoint.
- (on merchant) Update or cancel the transaction
- If the transaction is approved, update the transaction status in your system.
- If the transaction is rejected, cancel the transaction on your system.
4.2 Steps
- Create a payment Request
- Wait for callback
- Check Status
Once you’ve created a payment request, wait for a callback that will be sent once the user approves the request. While it’s not mandatory to utilize callbacks, it’s more efficient to do so. Alternatively, you can directly call the check status endpoint, but this isn’t recommended as you would need to continuously poll the server to check the status. Use this endpoint to check the status Transaction/Status.
To receive callbacks, you must set this up on your account (the profile that is used to create this transaction). You can set up the callback by accessing the settings/preferences in Xprizo. Configure the “Approval Webhook” to your desired API endpoint where you want to receive the callback. Alternatively, you can set this up using the Preference/SetApprovalWebhook endpoint.
5. Deposits Using M-Pesa
To receive deposits from a user via M-Pesa, initiate a deposit by transferring funds from the user’s M-Pesa account to your merchant’s wallet using the Transaction/MPesaDeposit endpoint.
5.1 Flow
5.2 Steps
- Add an M-Pesa deposit Transaction
- Wait for callback
- Check status
Once you’ve called the “MpesaDeposit” endpoint, a payment request is sent to the M-Pesa network and the user will then confirm the transaction on their phone. A pending transaction is also generated, and Xprizo will continuously monitor the M-Pesa network until a confirmation or failure is received.
- If a confirmation is received, the pending transaction will transition into a completed transaction.
- If the transaction is cancelled, a notification containing details about the cancellation will be generated and sent to the merchant’s account.
Merchants will receive updates on the transaction status via callbacks. To enable callbacks, you’ll need to configure this on your account (the profile used to create the transaction). You can accomplish this by navigating to the settings/preferences in Xprizo and configuring the “Approval Webhook” to point to a URL of your choice. Alternatively, you can achieve the same using the Preference/SetApprovalWebhook endpoint.
A callback will be sent when
- the pending transaction is created.
- the pending transaction is approved
- the pending transaction is cancelled
It is not strictly necessary to use callbacks, you have the option to periodically check the status of the transaction. However, it’s not recommended as it would require to poll the server continuously to check the status. However, it’s advisable to verify the status after receiving a callback to ensure that the transaction was completed successfully.
Use this endpoint to check the status Transaction/StatusByReference