
The purpose of this document is to provide a comprehensive guide to offer detailed insights into our API environments, and Authentication methods to be used at the time of integration.
NOTE: we are phasing out the old documentation
1. Environment
1.1. Testing (Sandbox)
Before integrating with the live production system, you have the option to test features on our dedicated test server. Access sample data and simulated transactions to ensure a smooth and error-free integration process. Experiment with the functionalities in a controlled environment before deploying to the production system for a seamless experience.
Base URL for Sandbox https://test.xprizo.com/api
1.2 Production (Live)
Once you have completed your testing phase, you can transition to the live environment by directing your system to the production server.
Base URL for Live https://wallet.xprizo.com/api
2. Authentication
Xprizo employs JWT tokens and API keys as authentication methods for accessing API functions. You have the flexibility to choose either authentication method when interacting with the endpoints. You need to pass a JWT token or API key in the header of each request.
**Note: You need to use a processing profile to create a token or key to use the API endpoints.
2.1. JSON Web Tokens (JWT)
2.1.1. Creating a Token
Creating a token is done by calling the GetToken endpoint with your username and password. If you are not a registered user you can register by going to the Sandbox or Live server.
Log in to the system using a username and password. You will receive back a JWT Bearer token that you will need to make secure API requests.
Request
curl --location '{baseurl}/Security/GetToken' \
--header 'accept: text/plain; x-api-version=1.0' \
--header 'x-api-version: 1.0' \
--header 'Content-Type: application/json; x-api-version=1.0' \
--data-raw '{
  "userName": "use username, mobile number to email",
  "password": "your password"
}'
Response
{
  "id": <a unique Id>,
  "token": <use this token for furture calls>,
  "expires": <the time the token expires>
}
2.1.2. Usages of Token
Use this token in the header of all secure
requests to other endpoint
curl -X 'GET' \
  '{baseurl}/Wallet/Info?contact=1' \
  -H 'accept: text/plain' \
  -H 'Authorization: bearer <token>
2.2. API Keys
2.2.1. Creating an API Key
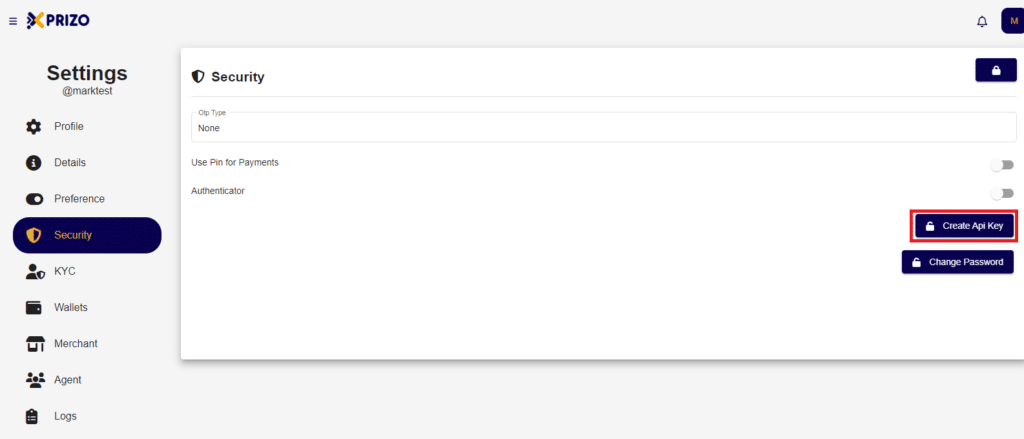
To configure your API key, access your User Account, navigate to ‘settings’ by clicking the profile icon, and locate ‘security’ in the list. Within the security settings, you will find an option to set the API key. It’s important to note that if the API key is removed, a new key must be issued and utilized for transactions.
2.2.2. Usages of API Key
Use the API key in the header in the following way.
curl -X 'GET' \
  '{baseurl}/Profile' \
  -H 'accept: text/plain' \
  -H 'x-api-key: <apiKey>
2.3. Know your account ID
To submit deposits for processing, you will need your accountId (wallet ID) from your account. You can find this by the following process, login to your account and open settings, find ‘wallet’ on the list and you will find an ID associated with the wallet. If a wallet doesn’t exist, you will be required to create one by clicking the ![]() button.
button.